Tuesday, November 11, 2008

Low Cholesterol Scalloped Potatoes

I have never made scalloped potatoes and I haven't had them in a long time, so I made this to go along with the crispy yogurt chicken. I have had this recipe saved for a while as a "healthier" recipe to try so I just went for it.


Low Cholesterol Scalloped Potatoes
Source: Spark Recipes

Ingredients:
4 cups thinly sliced potatoes
1 onion
1 tablespoon chopped parsley (optional)
3 tablespoons whole wheat flour
1/8 teaspoon pepper
1 1/2 teaspoons salt
3 tablespoons low cholesterol margarine
1 1/2 cups skim milk

Directions:
1. Layer potatoes and onions in casserole, sprinkling flour between each layer.
2. Heat milk and margarine and season with salt, pepper, and parsley. Pour sauce over all layers.
3. Bake 1 hour covered at 350 F. Remove cover and bake additional 30 minutes.
Makes 6 servings.


These turned out pretty good. I overcooked them just a tad so the edges were really dark, but they were nice and moist and flavorful in the middle. I tweaked the recipe a bit since it was only the two of us- I used 1 large baking potato, 1/4 of an onion, and 1 cup of milk and 2 tablespoons of margarine for the sauce. The proportions were right on and it could have fed about 4 people as a side dish.

Pioneer Woman's Crispy Yogurt Chicken

This was another one that has been floating around on the message boards for awhile, and a lot of people seemed to rave about it! For me, it was an easy weeknight dinner that came out great. It was very crispy, which I was happy with because some people had trouble getting it crispy enough. I will definitely be making this again - but I found it to be a bit bland, so I think I will add some stronger seasonings next time.


Crispy Yogurt Chicken
Source: Pioneer Woman

Chicken pieces (I used boneless skinless breasts)
2 cups plain, unflavored yogurt (I used fat free)
2-3 cloves garlic
Parsley
The juice of one lemon
Salt
Butter
Approx. 2 cups Panko bread crumbs


-Mix the yogurt, garlic, parsley, and lemon juice together in a bowl.
-Rinse the chicken, pat dry, and sprinkle with salt.
-In another bowl place the bread crumbs. Give them a sprinkling of salt too and then stir.
-Butter a baking dish. With tongs place the chicken, one piece at a time, into the yogurt mixture. Turn it over thoroughly to coat. Then roll the chicken in the Panko brad crumbs. Cover each piece thoroughly wiht bread crumbs and place in the baking dish.
-Finally, place a slice of butter over the large part of each chicken piece. Cover with foil and bake in a 350 degree oven for 1 to 1 1/4 hours, removing the foil for the last 15 minutes of the cooking. When the chicken is nice and golden, remove from the oven and enjoy!


Since I read about the problems people had getting it crispy, I made sure to get the excess yogurt off before I dipped in the bread crumbs. Also, I forgot to cover it with foil, but I think this was part of the reason mine got so crispy. It ended up only taking an hour without the foil.

Halloween Eyeball Cupcakes


My boss's birthday is on Halloween so we all brought in treats to celebrate. I had seen these on Confections of a Foodie Bride and I thought they would be perfect. I must confess, I cheated and used a box chocolate cake mix and jarred vanilla frosting, so no recipes there. I just wanted to show you my decorating!


I made these with gummy savers, brown mini m&ms, and for the frosting I mixed red food coloring into some of the frosting and used a ziploc with the corner cut off to pipe it on. They were a big hit at work!

Apple Spice Cookie Bars


These have been floating around on the message boards for awhile now so I made them to take to a tailgate to see what all the fuss was about- they were delicious! They were sitting outside in the cold weather and I think they might have even tasted better cold than warm! I did make one small change which was to sub in one cup of whole wheat flour for some of the all-purpose.

Apple Spice Cookie Bars
Source: Good Things Catered

Ingredients:
2 c. plus 2 Tbsp all purpose flour
2 tsp baking powder
1/4 tsp salt
2 tsp ground cinnamon
1/8 tsp nutmeg
1/8 tsp allspice
small pinch ground cloves
1/2 c. butter, melted
1 c. packed brown sugar
1 c. white sugar
2 eggs
1 Tbsp vanilla extract
2 apples, cored and diced (a little less than 2 c.)
cinnamon sugar for sprinkling

Directions:
-Preheat oven to 350 degrees and line 9x13 pan with foil and baking spray.
-In medium bowl, combine flour, baking powder, salt, cinnamon, nutmeg, allspice, and cloves.
-Whisk to combine well and set aside.
-In bowl of stand mixer, combine sugars and butter and beat on medium high until light and fluffy, about 1 minute.
-Add eggs, one at a time, beating well to combine.
-Add vanilla extract and beat to combine.
-Turn mixer on slow and fold in flour mixture a little at a time until just combined.
-Fold in apples.
-Spread mixture evenly into prepared pan and sprinkle top generously with cinnamon sugar.
-Place in oven and bake until cooked through, when top slightly bounces back to the touch, about 30 minutes.
-Remove from oven and let cool completely before removing from pan, cutting and serving. (bars will be very soft)


They were absolutely delicious and I would definitely make these again!

Monday, November 10, 2008

Veggie Pasta Salad


I love making this stuff, but I don't get a chance to very often. It is one of those things that you make for a crowd. I get carried away throwing stuff into it so it is hard for me to scale it back! It is great because you can use whatever veggies you love or whatever you have on hand. You can also adjust the seasonings to your taste. I loathe mayo so I use Italian salad dressing as the main ingredient.

Veggie Pasta Salad

3 bell peppers, assorted colors
2 small heads of broccoli
1 bunch green onions
1 bunch celery
3 carrots
1/2 - 1 cup Light Italian salad dressing
Seasoning salt
Fresh ground black pepper
Italian seasoning blend
Crushed red pepper flakes


Directions:
Cook the pasta and run it under cold water until it is chilled. Chop the veggies and toss with the pasta. Add the salad dressing and toss to coat. Season to taste.


This stuff is truly simple to make. It is best when you let it sit for a few hours or overnight before serving to let the flavors blend together. It is also fantastic as leftovers for snacks or portable lunches! I made this for a tailgate and was eating the leftovers all week, and never got sick of it.

Rigatoni with Spicy Sausage and Arugula

I have been a really bad blogger! I have been so busy the past couple weeks I haven't even had time to unload my pictures off my camera, so I apologize for the lack of updating!

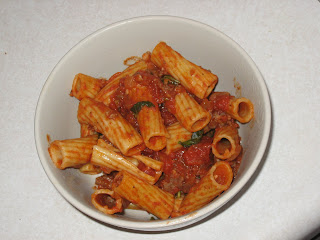
On to the food- the only thing I have to say about this is that it was delicious! I ate it for lunch for the next two days and it was just as good as the first time.

Rigatoni with Spicy Sausage-Tomato Sauce, Arugula, and Parmesan
Source: Bon Appetit Magazine, June 2008 via Pachey's Treats

1 tablespoon olive oil
1 large onion, chopped
3 garlic cloves, chopped
2 pounds fresh hot Italian sausage, casings removed
1/2 cup dry red wine
1 can (28 oz) diced tomatoes in juice
1 can (28 oz) crushed tomatoes with added puree
8 ounces rigatoni
2 cups (packed) fresh arugula, stemmed
1/2 cup thinly sliced basil leaves
1 tablespoon chopped fresh oregano (I used dried)
1/2 cup freshly grated Parmesan cheese (I omitted)

Heat oil in heavy large pot over medium heat. Add onion; saute until translucent, about 4 minutes. Add garlic; stir 1 minute. Add sausage; cook until browned, breaking up with back of spoon, about 5 minutes. Drain drippings. Add wine, diced tomatoes and crushed tomatoes; increase heat and bring to boil. Reduce heat to low and simmer 30 minutes to blend flavors, stirring occasionally.

Meanwhile, cook pasta in large pot of boiling salted water until tender but still firm to bite, stirring occasionally. Drain.
Stir pasta, arugula, basil and oregano into tomato sauce. Simmer until arugula wilts, stirring often, about 2 minutes. Season with salt and pepper. Transfer to large bowl. Sprinkle with Parmesan.


I didn't get a good picture of this before we ate, so this is actually my leftovers the next day... oops! I guess that is something I need to work on, because I have made several dishes over the last few weeks and totally forgotten to take photos. And what fun is a blog post with no photos!